CPC_Practicals
Workshop 08 - runner (p1 of 2)
Hello and welcome back!
This is optional!
This last example that we’re going to work through is something that puts a lot of the things that we’ve been looking at over the previous weeks into one applied project: an endless runner type of game/web-toy.
It is, by it’s nature, bigger and more complex than the stuff we’ve been working on so far. So we’ve supplied the structure in terms of the main classes, so you can understand how to go about designing the visual, interaction and sonic elements of the piece as we go. It is critical that you read every line/block of code in order to understand what’s going on…
Right, preamble over, over the next couple of weeks we will:
- Work from starter code provided that you will fork a new codesandbox from. This is because, to hit the ground running, we’ve designed the structure of the piece to let you understand how the parts all fit together…
- Create a game-type of environment with ground plane, then see how we can manipulate vertices and faces to create some interesting effects.
- Add some nice lighting and fog to our environment.
- Add an avatar into our world, then start moving through our scene.
- Put some obstacles into the scene, in this case it will be trees.
- Look at one of the key mechanics in creative/game-based coding: collision detection.
- Challenge you a bit more to think about what’s going on in the code by describing to what should happen; getting you to have a go at programming it yourself; then allowing you to see our solutions.
Here’s what we’re making, use the left and right arrow keys to move the avatar around…
Where code is provided, you are expected to write it out yourself rather than copying and pasting it. We know this is tempting, but the point of a university education is for you to learn the necessary skills for your field, and copying and pasting code will not be on any job descriptions.
Task 1 - Creating the ground
Right, we’re going to use a starter project again. So please fork the starer sandbox below.
As in the previous week’s starter code, it’s basically just our normal template but we’ve added some a couple of other pre-defined class files for you to work with.
- Which JS files are importing which libraries/other JS files?
Ground plane
We’ve already added all the global variables in the starter sandbox, so let’s get cracking with creating a ground plane.
Take a look through the Environment class to get an understanding of how it’s working. Now, back in index.js around line 83 where it’s specified, create a new instance of Environment and assign it to the variable called “ground”.
- As you can see from the constructor of Environment, we need to pass our scene in as an argument. How do you do this?
Hopefully you should have been able to do this yourself, but just in case here is the line that is required...
ground = new Environment(scene);
Try just enabling the orbit controls for a second to see what’s going on with this plane. That means finding the line that says orbit.enabled = false; and setting it to true. Refresh the codesandbox browser to take a look in the scene.
- Remember to set it back to false once you’ve taken a look around.
The faces
Right, so that ground plane is kind of, well, plain…! If you cast your mind back to week 03 when we were talking about using noise to manipulate vertices of objects this example, well that’s what we’re going to do here.
First we’re going to iterate over the vertices of the plane and add a bit of randomness to the x and y positions.
Then, we’re going to assign a random colour to each vertex of the face. Faces are triangular shapes used to compute the “skin” of a particular object. We’re going to use Hue Saturation and Value colour space to set the colours, as it’s easier to get ranges within a certain colour this way. Here is a link to more info on faces if you would like some.
OK, now go into the runnerObjects.js file and around line 16, after we’ve created the plane geometry, add the following code:
for (let i = 0; i < this.geometry.vertices.length; i++)
{
      //iterate through plane vertices and slightly randmise x and y positions to create some variation in the plane
      let vertex = this.geometry.vertices[i];
      vertex.x += Math.random() * 30 - 15;
      vertex.y += Math.random() * 30 - 15;
    }

    for (let i = 0, l = this.geometry.faces.length; i < l; i++) {
      // iterate through faces of plane geometry and randomise the colour to be varitions of green
      let face = this.geometry.faces[i];
      face.vertexColors[0] = new THREE.Color().setHSL(
        // Hue Saturation and Value (HSL) are easier to use for randomisation within a certain colour
        0.33, //green
        THREE.MathUtils.randFloat(0.5, 0.8), //randomise saturation between 0.5 and 0.8
        THREE.MathUtils.randFloat(0.5, 0.8) //randomise value between 0.5 and 0.8
      );
      face.vertexColors[1] = new THREE.Color().setHSL(
        0.33,
        THREE.MathUtils.randFloat(0.5, 0.8), //randomise saturation between 0.5 and 0.8
        THREE.MathUtils.randFloat(0.5, 0.8) //randomise value between 0.5 and 0.8
      );
      face.vertexColors[2] = new THREE.Color().setHSL(
        0.33,
        THREE.MathUtils.randFloat(0.5, 0.8), //randomise saturation between 0.5 and 0.8
        THREE.MathUtils.randFloat(0.5, 0.8) //randomise value between 0.5 and 0.8
      );
    }
Now, one last bit, we need to update our material to use vertexColors instead of a normal colour. So head into the part just below where we create our material and update it accordingly with the code below:
vertexColors: THREE.VertexColors //ensure vertex colours is set so that we can use the randomsation
OK, we’ve got a bit of texture on our plane now, good stuff!
Task 2 - Lighting/Shadows and Fog
So, we’ve got some texture, but it would be good to add some visual effects to our scene. So we’re going to add a directional light, and this time we’re going to ensure it casts a wide shadow to that all the objects in our scene will be bathed in light but will also cast a shadow onto the ground plane, to help give a sense of realism.
See this link for more info on lights and shadow
Now, we might not see the results of this until task 3, but it’s important that we get it set up now. There are quite a few lines below but they’re essentially just specifying, the near and far planes of the shadow limits, all the corner edges of the shadow limits and then making sure our shadow map (the resolution of the shadow) is nice and detailed.
So go and add the following code in correct place in the init() function in index.js. It is labelled, and should go just beneath where you initialise the directional light.
  light.position.set(-20, 50, -5); // set the light's initial position
  light.castShadow = true; // ensure that this light will cast a shadow
  // Please read here for more information about the below: https://threejs.org/docs/#api/en/lights/shadows/DirectionalLightShadow
  light.shadow.camera.near = 0.5;
  light.shadow.camera.far = 5000;
  light.shadow.camera.left = -500;
  light.shadow.camera.bottom = -500;
  light.shadow.camera.right = 500;
  light.shadow.camera.top = 500;
  light.shadow.mapSize.width = 2048;
  light.shadow.mapSize.height = 2048;
The background
Right now we’re going to set our scene’s background to all white using HEX values. And we’re going to add some fog so that it obscures the horizon a bit and objects will appear out of the mist! These are both things we’ve done before so have a think about what should go where in the init() function in index.js.
Take a look here if you need more information about how to create the fog effect…
If you're really struggling, these are the two lines of code that will set our background to white and add the fog...
scene.background = new THREE.Color(0xffffff); // set white background
scene.fog = new THREE.FogExp2(0xf0fff0, 0.006); // create some fog for VFX
So now you can see that we’ve whited out our scene with making a white background and adding some fog. Things are looking good, but nothing is moving yet?! That’s our next task…
Task 3 - Adding our Avatar and getting things moving
OK, now we want to create our avatar. How do we do this, and where? (it is labelled in the starter code so this one’s on you)
It's a singe line, what argument needs to be passed to the constructor?
avatar = new Avatar(scene);
Great, now we can see a grey block-y ball type thing in our scene! And hopefully it’s casting a nice shadow onto the plane too…
The update function
Now is the time to really get things moving. And as we now know, we want to perform updates to the objects in our scene in the update function of index.js.
Have a think about what needs to happen. We want to:
- Use our “speed” variable to update our camera’s z position each time update is called.
- Then we want to use the camera’s position to update the position of our directional light.
- Then we need to make sure our avatar gets updated by calling it’s update() function. Take a look at the update function and see which arguments need to be passed in…
- Finally we also need to call the ground’s (which is an instance of Environment) update function and pass in the necessary argument.
- This code should be added at the top of the main update function in index.js, outside the slower timed code
Have a go, but the required code to go in the update function in index.js is here.
 camera.position.z -= speed; //move camera through scene by subtracting speed from its current position
  light.position.copy(camera.position); // use the camera's position to update the directional light's position by copying the camera's position vector3
  light.position.y += 200; // ensure light then stays high above
  light.position.z -= 150; // ensure light then stays in the distance shining back at us
  avatar.update(speed, obstacles, keyboard); // call avatar's update function, passing in our speed, obstacles array and keyboard object as arguments
  ground.update(camera); // call Environment's update function, passing in our camera as an argument
Floating or Rolling?
Now we’re moving. But, hmmm, the avatar looks a bit weird because it’s not rolling along the ground, just sort of floating. So, at the top of the Avatar class’s update function, add the following:
this.hero.rotation.x -= 0.28;
Great, but have you noticed that the light still seems to be looking a bit odd, it’s like it’s not actually pointing where it’s supposed to. Well, that’s becuase we haven’t specified it to target our avatar.
We do that in the init() function after we’ve created the light and the avatar, by specifying the light’s target, which can be any Object3D:
light.target = avatar.hero;
Interaction!
Last but not least regarding our avatar, we now want it to move left and right using our arrow keys. That means adding or subtracting from its current position on the x axis, when the corresponding keyboard key is pressed. We’ve implemented a class that holds an array of booleans relating to which keycode is pressed. Take a look in the keyboard class, the documentKeyDown() and documentKeyUp() event handler functions in index.js.
- Can you get what’s going on here?
- Maybe try some
console.log()statements in those event handler functions to understand what’s happening when a key is pressed…
This structure works well because we can actually get our Avatar to do it’s own movement, because we’re passing the keyboard object (that contains the key code information) to it each time update is called. Now I happen to know that the codes for the left and right arrow keys are 37 and 39 respectively. So let’s go ahead and add the following code to the Avatar’s update function in runnerObjects.js…
if (keyboard.isKeydown(37) === true)
{
      // is the left arrow key pressed?
      this.hero.position.x -= 0.25; // move our "hero" mesh to the left
}

if (keyboard.isKeydown(39) === true)
{
      // is the right arrow key pressed?
      this.hero.position.x += 0.25; // move our "hero" mesh to the right
}
- Can you try changing the keys that it’s listening for “a” and “d” keys instead of the arrow keys?
Here is a pretty nifty little site that can help with finding which key codes to use…
Task 4 - Adding trees
We’ve taken care of the class definition of the trees for you here. But take a look through to understand what’s going on. Each tree is basically just three cones stacked on top of one another, simple really. But we’re using code to create them procedurally so we don’t have to use models.
First of all we want to make a function to create an array full of our tree obstacles. We’ll set them at random positions on the x and z axes. This will be handled in our made logic in index.js, so find the relevant section underneath the init() function add the following code:
function createTrees(avatar, ground)
{
  for (let i = 0; i < numObstacles; i++) { // loop through until we reach numObstacles
    let randPosX = THREE.MathUtils.randInt(-200, 200); // generate a random position to be used in x axis
    let randPosZ = THREE.MathUtils.randInt(-1000, -3000); // generate a random position to be used in the y axis

    obstacles.push(new TreeObstacle(randPosX, 7, randPosZ, scene)); // add a new tree to our obstacles array, passing in the random x and z values, keeping them at 7 on the y axis so that they sit nicely on the ground plane
  }
}
Good stuff, now we just need to call our createTrees function from within the init() function.
createTrees(avatar, ground);
Cool, we now get to a bit of a forest! But if we let it go on a while the forest runs out…!
We need a method of respawning or simply just moving our trees once we’ve passed them…
Task 5 - Respawning trees
What we need to do, is check whether each instance of TreeObstacle is in front of, or behind the camera. If it’s behind us, we’re going to sneakily move it to another random position in the distance so it will then emerge from the fog as if it’s a new tree!
Just below where we defined the createTrees function. We’re now going to go ahead and define a moveTrees function!
function moveTrees()
{
  for (let i = 0; i < obstacles.length; i++) { //iterate through our obstacles array
    let meshGroup = obstacles[i].meshGroup; // create a local variable and assign our meshGroup of cones contained within the TreeObstacle to it

    // respawn
    if (meshGroup.position.z > camera.position.z) { // is the obstacle behind us?
      obstacles[i].reset(); // call the reset function to move the obstacle and change its colour to green
    }
  }
}
Back to our Update function
Now all we need to do is call the moveTrees function from within the slower time code in the update function:
moveTrees();
Task 6 - Collision detection
As you can see in the example at the start of this sheet, the trees turn red when the avatar hits them. Simple right?!
Well, yes and no…
… the problem is that we need to constantly whether or not our avatar is colliding with objects in our scene. Those objects are not the Environment, but are the TreeObstacles.
First of all we need to break our problem down:
- We need to make sure that we only care about objects that are “collidable”, so we’ll use a boolean flag to set them to “collidable” or not.
- Upon each call to update, we need to iterate through our entire obstacles array.
- For each object in the array, we need to test, using simple pythagoras’ theorem, whether the disance between our avatar and the obstacle in question is less than a certain amount.
- If the distance between the avatar and the object is less than the sum of the sizes of both objects, we know we’re collding:
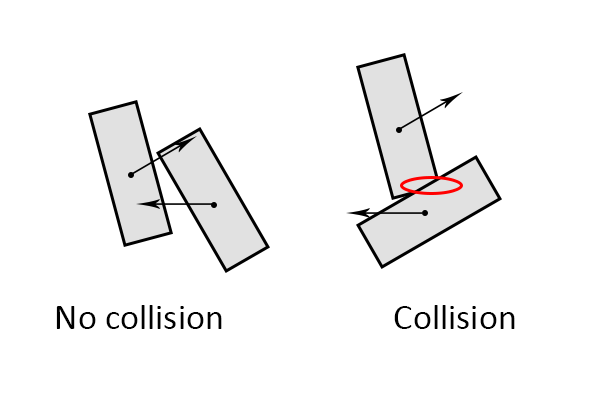
The great Daniel Shiffman has some really well described videos about collision detection on youtube, albeit in 2D. We’d recommend watching 7.6 and 7.7 if some of this is still unclear…
Take a look through the two helper methods we’ve defined in the Avatar class. One is called distanceTo(x,z) and the other is called isCollidedWith(that). Take a look through the code and comments to understand each method is doing. We are actually slightly cheating here to make things simpler, so we’re working in 2D on the x and z axes, not using the y axis.
Avatar Update function
First of all, in the Avatar’s update method, let’s add the code to call the third helper method called collidedWithObstacle(obstacles):
if (this.collidedWithObstacle(obstacles))
{
      // have we collided with an obstacle?
      console.log(" ------ CRASH ------- "); // print to console
}
We’re just going to print to the console for now, but we could do some cool stuff like trigger a sound based on this collision event.
Handling collisions
OK, now for the tricksy bit. In our collidedWithObstacle(obstacles) method, we need to iterate through all our obstacles; test whether they’re collidable or not; see if the distance between the two objects is less than the sizes of both objects; then if they are we change the colour of our obstacle and return true. If nothing has collided with the instance of avatar then we can return false and carry on:
for (let n = 0; n < obstacles.length; n++)
{
      // iterate through entire obstacles array
      if (obstacles[n].collidable === true) {
        // make sure that we actually care whether we collide with the object or not
        if (this.isCollidedWith(obstacles[n]) === true) {
          // have we collided?
          obstacles[n].material.color.setHex(0xff0000); //change the colour of that obstacle to red

          return true; // return true to our main update function so we can trigger our sound (and maybe do other stuff)
        }
      }
    }
    return false; // we didn't collide with anything so return false to our update function
}
Stretch goals
OK so hopefully now you have made a cool little endless runner project! Here are some stretch goals:
- Create another set of obstacles using some kind of THREE js shape primitive.
- Try and figure out how to trigger the CrashSound when the collision occurs.
- Implement a scoring system based on whether or not you are supposed to collect points or lose points depending on which obstacle you hit.
- Implement a way of increasing speed based on how many points you have. Could that be a level type system?
That’s it for this week!
Right we’re at the final task for this workshop hooray! 😊
Back up your work
Super important task: go to file->export to .zip in your codesandbox and download your project as a zip.
Remember, files in the cloud are just files on someone elses computer. It is critical to keep a good backup.